| | Tutorial - Silverback Gorilla |  |
|
+15Roger widukind kudu11 arafan animalluvr6 lucky luke boba_jagoda costicuba Wilorvise Kikimalou LeeAnn JonasV Ana SUSANNE MiniZoo 19 posters |
|
| Author | Message |
|---|
MiniZoo

Country/State : Australia
Age : 28
Joined : 2011-01-31
Posts : 406
| | Subject: Tutorial - Silverback Gorilla Sat Sep 06, 2014 2:24 am | |
| Hi friends, I've been inspired by some of the members of this forum who are just beginning to sculpt to put up a tutorial showing the process of making a Silverback Gorilla from start to finish. The basic principles I use can be applied to all different types of models. Hopefully following the whole thing from start to finish will be helpful to some. The first thing to share is that I'm a bit nervous every time I start a new sculpt. I like to pick subjects that challenge me and this one is definitely going to do that. I'm sure there will be mistakes along the way, but that's all part of the process. Welcome along for the ride. My subject is Ozoum (better known as Ozzie), a 53 year old Silverback Gorilla from the Atlanta Zoo. Click here to learn about Ozzie. Here's the picture I've chosen as my main pose and inspiration. 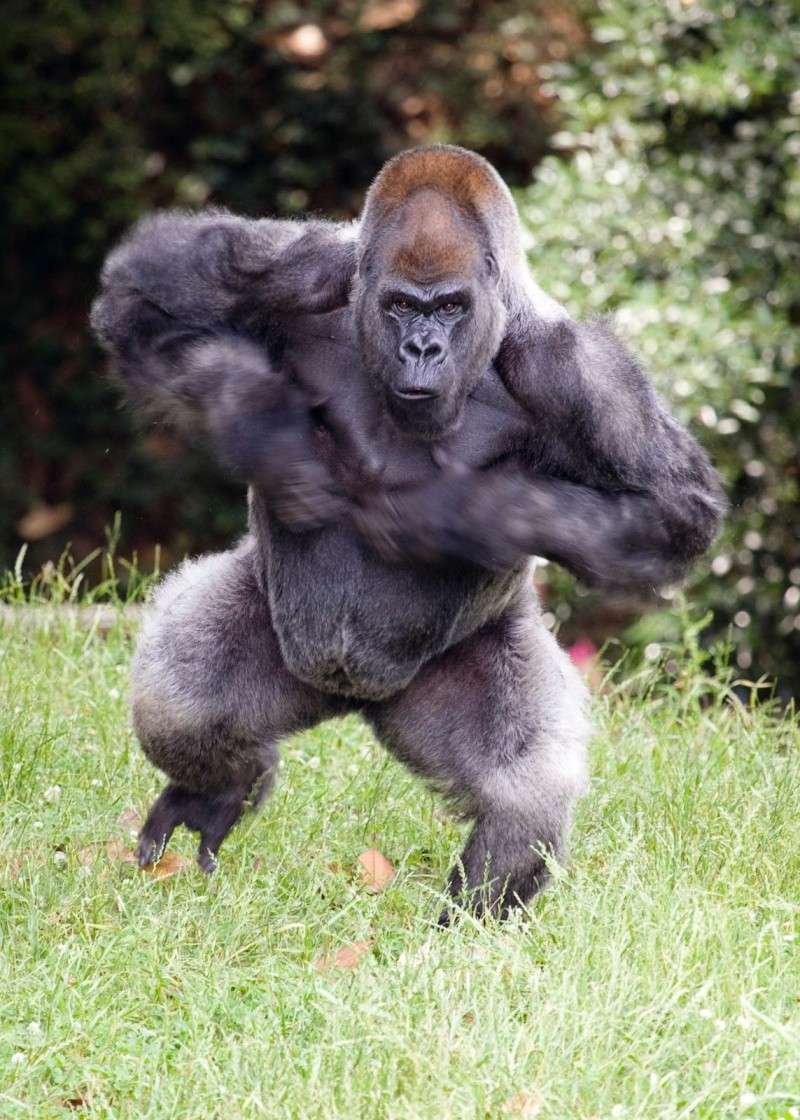 |
|
| | |
MiniZoo
Country/State : Australia
Age : 28
Joined : 2011-01-31
Posts : 406
| | Subject: Re: Tutorial - Silverback Gorilla Sat Sep 06, 2014 2:40 am | |
| Once my main pose is decided I'll look for supporting images that I can reference to. For example the hands are blurred in the picture above so I've found another similar pose with clear hands: 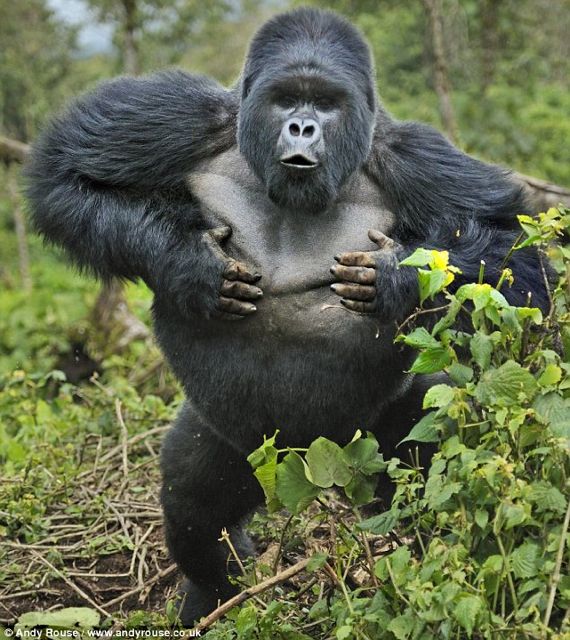 ... and I've also got a side profile of Ozzie's head which I can't see in the original image either. 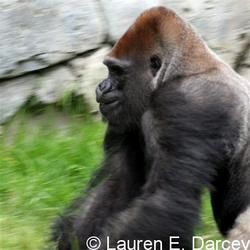 That will do for now. I will need other pictures later. |
|
| | |
Guest
Guest
| | Subject: Re: Tutorial - Silverback Gorilla Sat Sep 06, 2014 3:08 am | |
| Brillinat!  This is exactly what I need, to be able to see how you do it will be interesting to watch and hopefully I will pick up techniques for my own modeling. Good luck! |
|
| | |
MiniZoo
Country/State : Australia
Age : 28
Joined : 2011-01-31
Posts : 406
| | Subject: Re: Tutorial - Silverback Gorilla Sat Sep 06, 2014 3:13 am | |
| The next stage is to decide on the size of the model. I want this one to be fairly large and so I have very unscientifically grabbed a ruler and measured a rough height of 16-17cm. It's not any specific scale, just something I'm happy with. If I was making to scale (eg 1:22) I would Google the size of Silverback Gorillas and then use a Scale Converter to give me the actual model height, length etc. I'm going to make a wire armature to support Ozzie. This is a good idea even for small models. It doesn't have to be anything fancy - just a basic structure to build around. If making to an exact scale make sure you measure the armature a little bit smaller than the actual length of the model to allow for muscles and skin/feathers etc. An example of a basic armature is this bandicoot model I made a few months ago: 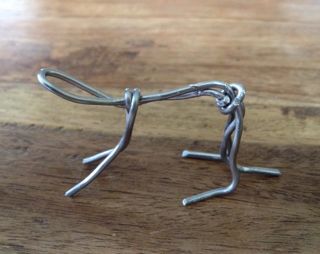  |
|
| | |
MiniZoo
Country/State : Australia
Age : 28
Joined : 2011-01-31
Posts : 406
| | Subject: Re: Tutorial - Silverback Gorilla Sat Sep 06, 2014 3:31 am | |
| Because this model is quite large I want to be very specific with the proportions so I've looked up a front and side view graphic of a Gorilla Skeleton. I've scaled it in a Word document to the size I need, printed it off and I'll be using this to model my armature from. You can see the cm markers on the side to give the correct printed size.  |
|
| | |
MiniZoo
Country/State : Australia
Age : 28
Joined : 2011-01-31
Posts : 406
| | Subject: Re: Tutorial - Silverback Gorilla Sat Sep 06, 2014 3:54 am | |
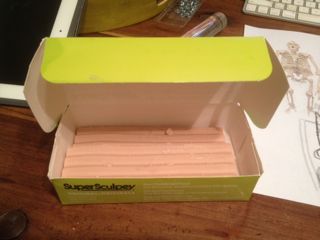
| This armature is a bit more complicated because of the size of the model and the detail I want. Here's what I need to make the armature: * Ruler * Armature wire (large roll) - can get wire from a hardware store but it can be harder to bend. I've bought mine from an art supply shop. * Wire (small) - this is florist wire from a craft shop. I use this to wrap around & tie the larger pieces together * Wire cutters * Long nose pliers for doing tight bends * Black marker for marking joints in the skeleton  |
|
| | |
SUSANNE
Admin
Country/State : Denmark, the peninsula of Djursland.
Age : 72
Joined : 2010-09-30
Posts : 37808
| |
| | |
Ana

Country/State : Utrecht/NL
Age : 37
Joined : 2010-04-01
Posts : 11003
| | Subject: Re: Tutorial - Silverback Gorilla Sat Sep 06, 2014 5:16 am | |
| Amazing tutorial!!! 
_________________
Anna
Horse and Bird studio - Horse sculptures
My model horse collection
|
|
| | |
JonasV
Country/State : Finland
Age : 28
Joined : 2012-07-23
Posts : 5657
| | Subject: Re: Tutorial - Silverback Gorilla Sat Sep 06, 2014 7:10 am | |
| Oh wow these things here look so cool!   Thank you! _________________ Jonas Animals are my friends. I don't eat my friends.  |
|
| | |
LeeAnn
Country/State : United States
Age : 25
Joined : 2013-01-20
Posts : 10339
| | Subject: Re: Tutorial - Silverback Gorilla Sat Sep 06, 2014 8:46 am | |
| Very exciting! How generous of you to commit your time and energy to make a tutorial! |
|
| | |
Kikimalou
Admin
Country/State : Lille, FRANCE
Age : 60
Joined : 2010-04-01
Posts : 21168
| | Subject: Re: Tutorial - Silverback Gorilla Sun Sep 07, 2014 2:57 am | |
| |
|
| | |
MiniZoo
Country/State : Australia
Age : 28
Joined : 2011-01-31
Posts : 406
| | Subject: Re: Tutorial - Silverback Gorilla Sun Sep 07, 2014 3:03 am | |
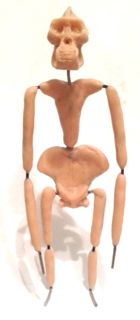
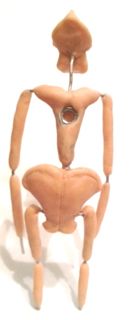
| Now I use my armature wire to shape one half of the skeleton starting at the foot and working my way around the pelvis, up the spine and then out to the shoulder sockets and back down the arms. I also use the side view to capture the slight bend in the knees and the forward lean at the hips. I also mark the joints: ankle, knee, hip, shoulder, elbow and wrist with the black marker. This will become really important later on. The 2nd photo shows the two sides shaped, the 3rd shows the two halves tied together with the florist wire. The 4th photo shows an extra piece for the neck and skull added and tied together. 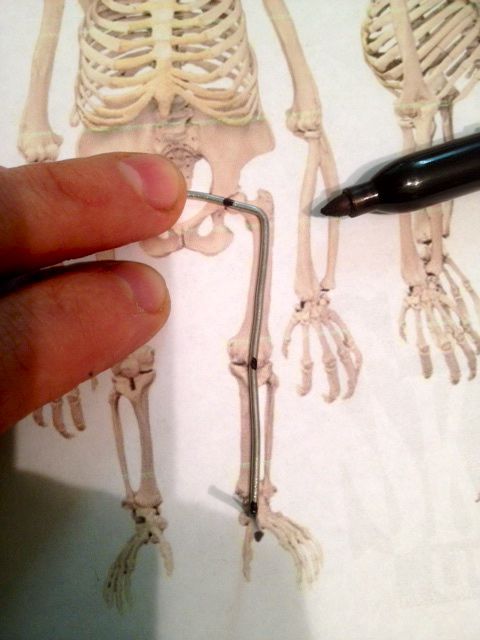  There's a deliberate hole in the chest cavity. Normally you wouldn't worry about this, but being a larger heavier model it will be supported by an armature stand when I'm sculpting and that needs an attachment point. The armature is now formed but not yet posed. I think it helps to get the proportions right with a basic standing pose before bending the wire to the final pose. If you try to pose too early it's easy to end up with one leg longer than another etc. The 5th photo shows extra florist wire wrapped around the arms and legs. We'll see why soon. 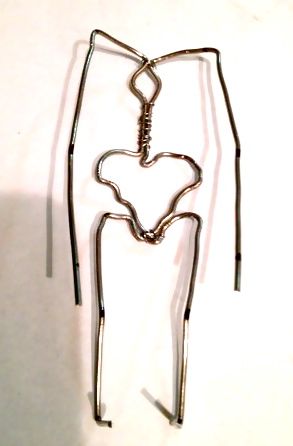   I'm pleased that the armature stands with no support. It might not be a big deal but for me it means the balance is right.
Last edited by MiniZoo on Sun Sep 07, 2014 4:04 am; edited 1 time in total |
|
| | |
MiniZoo
Country/State : Australia
Age : 28
Joined : 2011-01-31
Posts : 406
| | Subject: Re: Tutorial - Silverback Gorilla Sun Sep 07, 2014 3:06 am | |
| |
|
| | |
SUSANNE
Admin
Country/State : Denmark, the peninsula of Djursland.
Age : 72
Joined : 2010-09-30
Posts : 37808
| |
| | |
Guest
Guest
| | Subject: Re: Tutorial - Silverback Gorilla Sun Sep 07, 2014 3:21 am | |
| So you normally begin with a skeleton? That is a good idea, hmmm  would it work for a bird? I have been trying to figure out how I should best make a fantail wire skeleton. |
|
| | |
MiniZoo
Country/State : Australia
Age : 28
Joined : 2011-01-31
Posts : 406
| | Subject: Re: Tutorial - Silverback Gorilla Sun Sep 07, 2014 3:30 am | |
| |
|
| | |
Guest
Guest
| | Subject: Re: Tutorial - Silverback Gorilla Sun Sep 07, 2014 3:37 am | |
| Thankyou very much, this helps a lot I will begin my wire skeleton today and follow along with you |
|
| | |
MiniZoo
Country/State : Australia
Age : 28
Joined : 2011-01-31
Posts : 406
| | Subject: Re: Tutorial - Silverback Gorilla Sun Sep 07, 2014 4:20 am | |
| |
|
| | |
Wilorvise
Country/State : Colorado, USA
Age : 40
Joined : 2014-08-24
Posts : 2218
| | Subject: Re: Tutorial - Silverback Gorilla Sun Sep 07, 2014 11:31 pm | |
| Easy to follow directions with supporting pics for clarification. I like. Much happiness. :)
_________________
Laura
|
|
| | |
MiniZoo
Country/State : Australia
Age : 28
Joined : 2011-01-31
Posts : 406
| |
| | |
Guest
Guest
| | Subject: Re: Tutorial - Silverback Gorilla Mon Sep 08, 2014 2:58 am | |
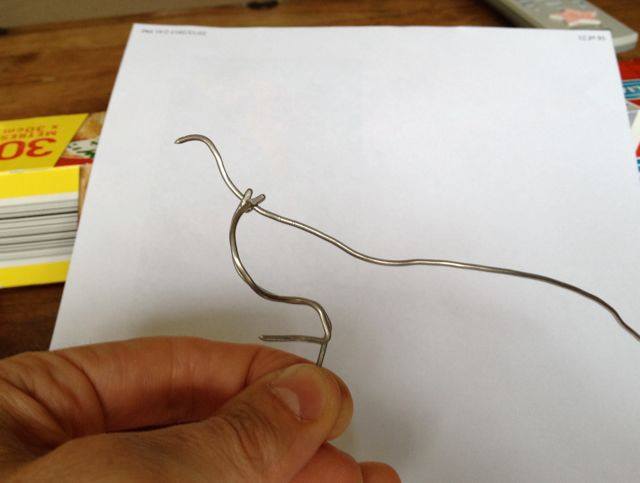
| Many, many thanks It is the tail that I am having trouble with at the moment. Fantails are not easy to do  I made the wire skeleton yesterday, it was so small that I had to use a hot glue gun to stick them together. Then I molded the clay on for the body. It is working so far, thanks for your help  I don't want to hijack the topic  But do you think that useing very thin peices of wire stuck in the clay at the back would do for the tail. If you can understand what I mean? And then I could mold clay around the wire in the shape of a tail. It is great to be following along with you even if we are doing different species  |
|
| | |
MiniZoo
Country/State : Australia
Age : 28
Joined : 2011-01-31
Posts : 406
| | Subject: Re: Tutorial - Silverback Gorilla Mon Sep 08, 2014 4:12 am | |
| |
|
| | |
MiniZoo
Country/State : Australia
Age : 28
Joined : 2011-01-31
Posts : 406
| | Subject: Re: Tutorial - Silverback Gorilla Mon Sep 08, 2014 6:20 am | |
| |
|
| | |
MiniZoo
Country/State : Australia
Age : 28
Joined : 2011-01-31
Posts : 406
| | Subject: Re: Tutorial - Silverback Gorilla Mon Sep 08, 2014 6:41 am | |
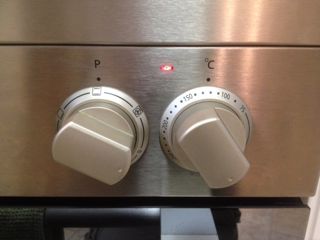
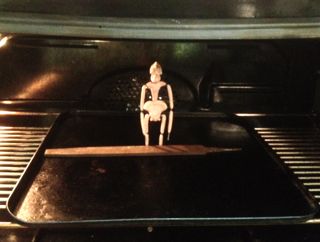
| Here's the skeleton baked and ready to pose. The bones are now hard so I can move him around and adjust the position even while adding the outer clay - without worrying about him losing proportion. I don't recommend doing bones and a prebake like this for smaller models. That would be overcomplicating them. Just a wire armature is enough for most figures. Think of this as an extra step that can be adopted depending on what is being modeled. 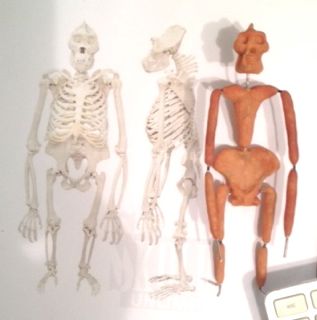 You'll notice he hasn't got a rib cage. That's no problem - I'll just make the belly from clay. |
|
| | |
JonasV
Country/State : Finland
Age : 28
Joined : 2012-07-23
Posts : 5657
| | Subject: Re: Tutorial - Silverback Gorilla Mon Sep 08, 2014 6:56 am | |
| _________________ Jonas Animals are my friends. I don't eat my friends. |
|
| | |
Sponsored content
| | Subject: Re: Tutorial - Silverback Gorilla | |
| |
|
| | |
| | Tutorial - Silverback Gorilla | |
|