| | Tutorial - Silverback Gorilla |  |
|
+15Roger widukind kudu11 arafan animalluvr6 lucky luke boba_jagoda costicuba Wilorvise Kikimalou LeeAnn JonasV Ana SUSANNE MiniZoo 19 posters |
|
| Author | Message |
|---|
Ana

Country/State : Utrecht/NL
Age : 37
Joined : 2010-04-01
Posts : 11003
 |  Subject: Re: Tutorial - Silverback Gorilla Subject: Re: Tutorial - Silverback Gorilla  Mon Sep 08, 2014 1:02 pm Mon Sep 08, 2014 1:02 pm | |
| I love this tutorial! I usually don't make a skeleton which reflect real bones but I think it's great idea and I would love to try it, especially with bigger sculptures it may be very useful! 
_________________
Anna
Horse and Bird studio - Horse sculptures
My model horse collection
|
|
  | |
MiniZoo

Country/State : Australia
Age : 28
Joined : 2011-02-01
Posts : 406
 |  Subject: Re: Tutorial - Silverback Gorilla Subject: Re: Tutorial - Silverback Gorilla  Mon Sep 08, 2014 1:40 pm Mon Sep 08, 2014 1:40 pm | |
| This is the fun part  .. and where the 'bones' method has really come in useful. I've sized my inspiration photo onscreen to the model size and then roughly copied the pose. I can fine tune it as I go.  I've also now tested the armature on my homemade stand - works perfectly, nice and stable! I think he looks kind of cool!  |
|
  | |
SUSANNE
Admin

Country/State : Denmark, the peninsula of Djursland.
Age : 72
Joined : 2010-09-30
Posts : 37808
 | |
  | |
JonasV
Country/State : Finland
Age : 28
Joined : 2012-07-23
Posts : 5657
 |  Subject: Re: Tutorial - Silverback Gorilla Subject: Re: Tutorial - Silverback Gorilla  Mon Sep 08, 2014 2:55 pm Mon Sep 08, 2014 2:55 pm | |
| So imprssive   So interesting to follow this  _________________ Jonas Animals are my friends. I don't eat my friends.  |
|
  | |
Guest
Guest
 |  Subject: Re: Tutorial - Silverback Gorilla Subject: Re: Tutorial - Silverback Gorilla  Tue Sep 09, 2014 2:01 am Tue Sep 09, 2014 2:01 am | |
| Exciting to watch  |
|
  | |
MiniZoo

Country/State : Australia
Age : 28
Joined : 2011-02-01
Posts : 406
 |  Subject: Re: Tutorial - Silverback Gorilla Subject: Re: Tutorial - Silverback Gorilla  Tue Sep 09, 2014 12:31 pm Tue Sep 09, 2014 12:31 pm | |
| Thanks Ana, Suzanne, Jonesee and Emma - I'm so glad you're enjoying it  The armature is now ready so we move onto the next phase - sculpting! I've laid out my gear here:  * Super Sculpey Firm - I've switched to the firm clay now for the main work. I find the 'firm' version of the clay holds detail much better when I'm turning the model over in my hands. It takes a little longer to roll and make malleable but it's worth it to me. * Scalpel - for cutting away excess clay * Metal tools - sharp for detailing, leaf shaped tool for smoothing * Wooden tools - for rough working the clay, pushing into shape etc * Wire loops - for scraping away small areas * Metal ball ends - for smoothing & detailing small areas * Clay brushes - these are not paint brushes. They have a very smooth firm bristle and are used to brush over and smooth the detailed clay * Metal turntable - love this. Can sit the model on and turn it around all angles reducing the handling. I don't use all of the tools, but will pick and choose the ones I need. I'll probably only use 7 or 8 of these as I tend to stick with my favorites. Also I want to emphasise that you can still produce really nice models with only 2 or 3 tools. If you're starting out it costs a lot to buy all of this so a simple $15 wooden clay tool set can do a great job! |
|
  | |
MiniZoo

Country/State : Australia
Age : 28
Joined : 2011-02-01
Posts : 406
 |  Subject: Re: Tutorial - Silverback Gorilla Subject: Re: Tutorial - Silverback Gorilla  Tue Sep 09, 2014 12:49 pm Tue Sep 09, 2014 12:49 pm | |
| When I was searching for reference photos I came across this amazing image of the muscular system of a gorilla. Because these animals are so hairy this will be really helpful in shaping the arms, shoulders, chest and legs. I keep all of my reference photos on my iPad so it's easy to flick between them as I go.  |
|
  | |
JonasV

Country/State : Finland
Age : 28
Joined : 2012-07-23
Posts : 5657
 |  Subject: Re: Tutorial - Silverback Gorilla Subject: Re: Tutorial - Silverback Gorilla  Tue Sep 09, 2014 1:31 pm Tue Sep 09, 2014 1:31 pm | |
| That's really good photo and surely helpful! I guess if someone wanna try a horse there's this kind of photos in internet. The upper photo helps me to know what I need if I try to make my own model, thank you  _________________ Jonas Animals are my friends. I don't eat my friends.  |
|
  | |
LeeAnn
Country/State : United States
Age : 25
Joined : 2013-01-20
Posts : 10339
 |  Subject: Re: Tutorial - Silverback Gorilla Subject: Re: Tutorial - Silverback Gorilla  Tue Sep 09, 2014 1:53 pm Tue Sep 09, 2014 1:53 pm | |
| I missed several steps here  Great that you try to keep to every natural detail.  |
|
  | |
costicuba
Country/State : Bulgaria
Age : 43
Joined : 2014-06-14
Posts : 4221
 |  Subject: Re: Tutorial - Silverback Gorilla Subject: Re: Tutorial - Silverback Gorilla  Tue Sep 09, 2014 2:11 pm Tue Sep 09, 2014 2:11 pm | |
| I agree with everybody... Your decision, to show the process of your work, the way how you think during the work..., how and from what you make this model... everything is wonderful.... clever..and properly. Great tutorial ! It reminds me of my Art school :) ..but there I was making human bodies. Anyway..it`s the same. First we lurned about the skeleton..then muscles... My last sculpture at the school was a creature between a human and goad : ``Satyr`` ( Faun, Pan) ..and he plays on ``Avlos``(musical instrument) It was human size sculpture...  I realy like your work.. and I realy like gorillas... I can`t wait to see your next topic  _________________  KOSTA KOSTA  |
|
  | |
MiniZoo

Country/State : Australia
Age : 28
Joined : 2011-02-01
Posts : 406
 |  Subject: Re: Tutorial - Silverback Gorilla Subject: Re: Tutorial - Silverback Gorilla  Tue Sep 09, 2014 2:16 pm Tue Sep 09, 2014 2:16 pm | |
| Now to add the clay! Photo 1. Polymer clay is expensive so I've used a bit of aluminium foil rolled up into a ball to bulk out the belly area and save on some clay.  Photo 2 - simply flattened out the clay and wrapped it around the ball.  Photo 3 - attaching the belly 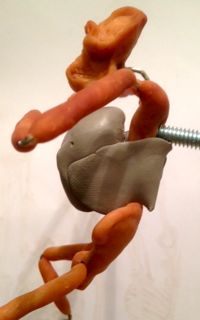 Photo 4 - adding the clay in small, manageable chunks, working quickly just with my fingers, not worried about details yet  Photo 5 - main areas covered but face, hands & feet to be left until later as they are the most detailed 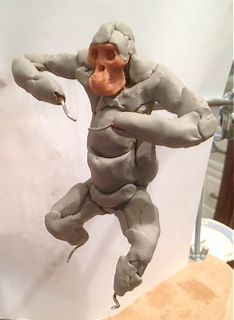 I think working quickly is good at this stage as it's easy to get bogged down worrying about detail too soon. Just try to work to the basic shape. _________________ - Tahnaya  https://www.minizoo.com.au/ |
|
  | |
MiniZoo

Country/State : Australia
Age : 28
Joined : 2011-02-01
Posts : 406
 |  Subject: Re: Tutorial - Silverback Gorilla Subject: Re: Tutorial - Silverback Gorilla  Tue Sep 09, 2014 2:18 pm Tue Sep 09, 2014 2:18 pm | |
| Welcome along Costicuba! _________________ - Tahnaya  https://www.minizoo.com.au/ |
|
  | |
boba_jagoda

Country/State : Germany
Age : 44
Joined : 2013-11-22
Posts : 128
 |  Subject: Re: Tutorial - Silverback Gorilla Subject: Re: Tutorial - Silverback Gorilla  Wed Sep 10, 2014 7:30 am Wed Sep 10, 2014 7:30 am | |
| Very nice and usefull tips here, thank you for showing this  I have no big ambitions to make my own models, but I can imagine how much work it is making one with a bottom up approach like this  |
|
  | |
MiniZoo

Country/State : Australia
Age : 28
Joined : 2011-02-01
Posts : 406
 |  Subject: Re: Tutorial - Silverback Gorilla Subject: Re: Tutorial - Silverback Gorilla  Wed Sep 10, 2014 11:20 am Wed Sep 10, 2014 11:20 am | |
| After adding the first layer of clay I start to smooth it - mostly using my finger tips but sometimes with the wooden tools for tight areas. Again I'm working fairly quickly. Then it's a matter of gradually adding the clay / smooth / add some more - comparing with my reference photos for overall dimensions, making slight adjustments to the pose. I also pay attention to the large muscle shapes and start forming the muscles during this process. This photo is a quick smooth after the first layer of clay. 
Last edited by MiniZoo on Wed Sep 10, 2014 1:57 pm; edited 1 time in total |
|
  | |
LeeAnn

Country/State : United States
Age : 25
Joined : 2013-01-20
Posts : 10339
 |  Subject: Re: Tutorial - Silverback Gorilla Subject: Re: Tutorial - Silverback Gorilla  Wed Sep 10, 2014 1:47 pm Wed Sep 10, 2014 1:47 pm | |
| It's starting to come together!  |
|
  | |
MiniZoo

Country/State : Australia
Age : 28
Joined : 2011-02-01
Posts : 406
 |  Subject: Re: Tutorial - Silverback Gorilla Subject: Re: Tutorial - Silverback Gorilla  Thu Sep 11, 2014 12:00 pm Thu Sep 11, 2014 12:00 pm | |
| More clay added and starting to define muscles. Also put some 'skin' around the face and given some shape to the top of his head. I've done a focus on the right leg with how the muscles are built up and then smoothed a bit with the largest metal ball end tool. Still all very rough but at least he's starting to look like a gorilla! The key thing is to keep looking at it from all angles and still focusing on getting the overall dimensions right. I've noticed when looking from the side that the belly isn't protruding enough so more clay to be added there. You'll also see I've drawn a line from the chin to the groin. I can now measure from this center line to the outer edges and ensure that both sides are built up evenly.    |
|
  | |
SUSANNE
Admin

Country/State : Denmark, the peninsula of Djursland.
Age : 72
Joined : 2010-09-30
Posts : 37808
 | |
  | |
JonasV

Country/State : Finland
Age : 28
Joined : 2012-07-23
Posts : 5657
 |  Subject: Re: Tutorial - Silverback Gorilla Subject: Re: Tutorial - Silverback Gorilla  Thu Sep 11, 2014 12:48 pm Thu Sep 11, 2014 12:48 pm | |
| I can see who knows what he's doing... This is just wonderful! I enjoyed :) _________________ Jonas Animals are my friends. I don't eat my friends.  |
|
  | |
MiniZoo

Country/State : Australia
Age : 28
Joined : 2011-02-01
Posts : 406
 |  Subject: Re: Tutorial - Silverback Gorilla Subject: Re: Tutorial - Silverback Gorilla  Fri Sep 12, 2014 10:11 am Fri Sep 12, 2014 10:11 am | |
| |
|
  | |
MiniZoo

Country/State : Australia
Age : 28
Joined : 2011-02-01
Posts : 406
 |  Subject: Re: Tutorial - Silverback Gorilla Subject: Re: Tutorial - Silverback Gorilla  Sat Sep 13, 2014 11:30 pm Sat Sep 13, 2014 11:30 pm | |
| I was able to spend about 6 hrs on Ozzie yesterday which was great. Work is progressing at a much slower rate now because the detail is being added. He still doesn't have a face but I'm hoping to get onto that today  I spent a lot of time working on the leg muscles. Without any background in anatomy I'm constantly looking up reference photos (leg anatomy etc) on google and doing my best to apply it. He now has a right foot, hamstrings, calves, better arms, rib definition and I've also repositioned his head slightly to give him slightly more of a neck.  This picture shows much smaller pieces of clay being added and blended now. After stepping back and looking at him from a bit further away I realised his right shoulder wasn't quite in proportion with the left shoulder. So it's now a matter of tiny little adjustments here and there. It's definitely worth taking a step back occasionally and viewing your model from a wider angle. 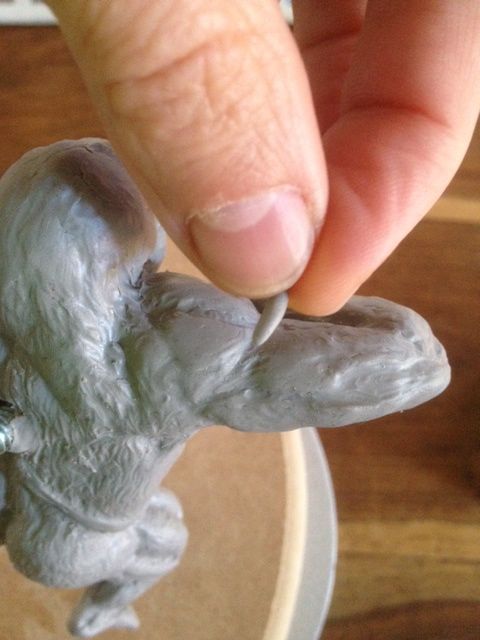 Please feel free to ask questions at any time. I've also done some basic texturing on his back, using a smaller ball end tool and adding small wavy lines in the direction of the hair.  |
|
  | |
LeeAnn

Country/State : United States
Age : 25
Joined : 2013-01-20
Posts : 10339
 |  Subject: Re: Tutorial - Silverback Gorilla Subject: Re: Tutorial - Silverback Gorilla  Sun Sep 14, 2014 4:56 pm Sun Sep 14, 2014 4:56 pm | |
| |
|
  | |
JonasV

Country/State : Finland
Age : 28
Joined : 2012-07-23
Posts : 5657
 |  Subject: Re: Tutorial - Silverback Gorilla Subject: Re: Tutorial - Silverback Gorilla  Sun Sep 14, 2014 7:03 pm Sun Sep 14, 2014 7:03 pm | |
| looking awesome! You're giving me enthusiasm to do my own models!  _________________ Jonas Animals are my friends. I don't eat my friends.  |
|
  | |
MiniZoo

Country/State : Australia
Age : 28
Joined : 2011-02-01
Posts : 406
 |  Subject: Re: Tutorial - Silverback Gorilla Subject: Re: Tutorial - Silverback Gorilla  Mon Sep 15, 2014 10:12 am Mon Sep 15, 2014 10:12 am | |
| Thanks LeeAnn & Jonas (Jonas it would be great to see you have a go at your own models!). Well Ozzie finally has a face! It will still get further refined but most of the detail is there. I've gone further along with the texturing as it helps me get a better perspective on the areas that need more work. First photo shows texturing with a very fine ball end tool. Second photo shows smoothing the bare skin of the chest with one of my clay brushes.  
Last edited by MiniZoo on Mon Sep 15, 2014 12:09 pm; edited 1 time in total |
|
  | |
SUSANNE
Admin

Country/State : Denmark, the peninsula of Djursland.
Age : 72
Joined : 2010-09-30
Posts : 37808
 | |
  | |
MiniZoo

Country/State : Australia
Age : 28
Joined : 2011-02-01
Posts : 406
 |  Subject: Re: Tutorial - Silverback Gorilla Subject: Re: Tutorial - Silverback Gorilla  Mon Sep 15, 2014 12:22 pm Mon Sep 15, 2014 12:22 pm | |
| |
|
  | |
Sponsored content
 |  Subject: Re: Tutorial - Silverback Gorilla Subject: Re: Tutorial - Silverback Gorilla  | |
| |
|
  | |
| | Tutorial - Silverback Gorilla |  |
|
